10.23.15 Video Tutorial: Recoloring CU Miniflowers

We all lover flowers and sometimes we need a certain color that isn’t included in the kit. Chelle of Chelle’s Creations has a video tutorial showing us how to recolor her CU Miniflowers. Follow along and create a rainbow of flowers. Enjoy!

This week, with Halloween just around the bend, it must be on the minds of many because without knowing it two of Chelle’s amazing CT ladies created a layout using the same kit, Trick or Treat. They both also used the CU MiniFlowers.

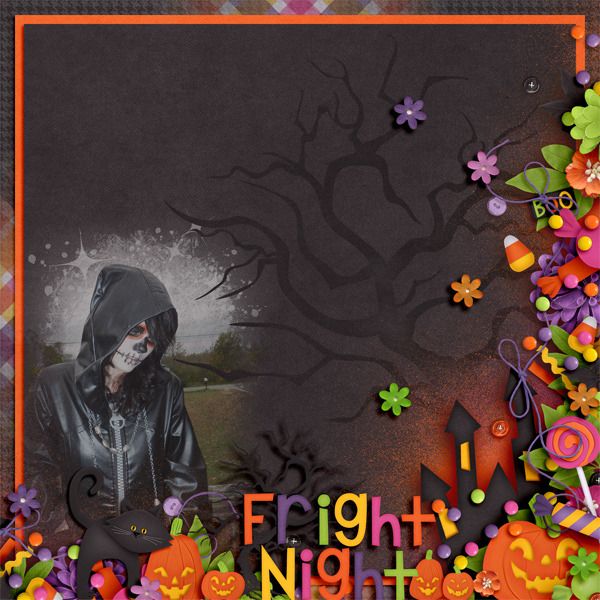
First up is Christine (Carolina Scrapper) with this frightfully stunning page. Isn’t her border cluster just gorgeous? I also love the way the photo is blended into the page. She recolored the purple flower to dark purple, the pink flower to dark pink and the yellow flower to green and orange.

I love how you can use the same kit and get two totally different looking pages. Krista (kc71595) created a page about picking out that perfect pumpkin. She created a darker purple flower for this page.

Head over the Chelle’s store and check out the CU MiniFlowers. While you are there see if you have missed any goodies she has released.

If you create a page using the mini flowers or any of Chelle’s products be sure to share them in the Scrap Orchard gallery. We love seeing what you create. Happy scrapping!

8.20 Video Tutorial: Resize Larger Action

Do you have older photos that you scanned or photos taken on your phone that you would love to use on layouts but they are just too small? You’ve tried just dragging to make them larger but they get distorted and grainy. Today I’m here to share with you a video on how to use to an action Chelle of Chelle’s Creations created that helps resize photos with the least amount of quality loss. Better yet Chelle is offering this action to you for FREE on her blog. Watch how to use this action below.

Now that you have seen how to use this action, head on over to the blog to pick it up. You can get it here.

Thanks so much for joining us for this tutorial. I hope it this tip allows you to use some of those older scanned photos on your layouts.

08.13 Video Tutorial: Resize Photo Spots in Templates

Have you been searching through your template stash and find a template you really like but it just doesn’t work with all your photos? Chelle of Chelle’s Creations has created a video tutorial to show you how to make those template work for you. Watch the video below as Chelle shares her helpful tips to get those photo spots to be just the right size.

Here are a few gorgeous examples of how Chelle’s lovely ladies used this trick to make the templates work for them.

Jan (QuiltyMom) used the the Have Yourself a Merry Little Christmas {Templates}. She made several of the photo spots bigger to fit her pictures. She also rotated a photo to accommodate a horizontal photo. The Get Your Grill On kit compliments her photos perfectly.

Some times you don’t need to make the photo spots bigger, some times you need them a little smaller. That is what Coral (Iowan) did to a few of the photo spots in her layout using the Lay it On There {Singles} 3 & 4. The One Year Older kit is perfect for this birthday layout. I really love her candle scatter as well the photo tucked underneath the present cluster.

Did you love the products Chelle used for her video? You can grab them in her store at Scrap Orchard. While you are there check out the other fabulous goodies she has to offer. She has a growing line of Lay It On There templates that are both single and double pages.

Hope this tips helps. I will see you in a few weeks with another great tip from Chelle.

07.23 Video Tutorial: Weave Elements

Welcome to another video tutorial brought to you by Chelle of Chelle’s Creations. Today I have picked out a video showcasing how to weave elements, such as strings through a alpha. In addition, Chelle with let you in on her easy hack to fix the shadows. I hope you enjoy this video.

As always Chelle’s talented group a layouts have created layouts using the technique Chelle teaches in her video.

Mel (KSCroppyChick) created this fun layout using On The Water and the Lay It On There Singles 7. I love how she incorporated the rope that one would use to go tubing into her title work.

Using Slice of Summer and Lay It On There Singles 1 Helen (winipeg1) created this adorable layout. Ice sounds a great way to keep cool on these hot summer days.

Did you love the alpha Chelle used in here video? Head over to her store to pick up it. Since this video was created several months ago the template she used has been released so you can pick that up as well. While you’re there see what other goodies she has.

I hope you enjoyed this video. I’ll see you again next month with two more videos.

07.09 Video Tutorial: Ideas for Alpha Doodles

Chelle’s Creations has so many alpha doodles to choose from in the store at Scrap Orchard. Today I’m going to share Chelle’s video tutorial with a few ways to add a little more pizazz to them. (Note some of the alphas in the video may no longer be available). Check out Chelle’s 10 tips.

Chelle’s very talented ladies have used some of the ideas in the video and here are the layouts they came up with.

Roxana (roxanamdm) created a a wooden look to the CU Sketched Alpha on the bottom of her page. On the upper layer she added a drop shadow, an inner shadow, an inner glow and some bevel and emboss. On the second layer she just added a drop shadow and clipped a paper to the doodle. She used the Black Belt kit for this page.

Using some of Chelle’s new items (Slice of Summer {Sampler}, Slice of Summer {Alpha}, and Lay It On There {Singles} 1 & 2) Kimberly (enjoyyourpix) created this delicious looking layout. She placed the alpha on top or an element to create her title.

I enjoy seeing how the same template can be used but get a totally different look. Also using the Lay It On There {Singles} 1 & 2, Karen (zippoh) created this beautiful layout. For the layout she used Bug Town {mini kit} and Green Thumb. She took a flower and leaves from Green Thumb and shrunk them to use as accents on your title.

Head over to Chelle’s store and check out all the alpha doodles she has there. Then try one of the suggestions out on a layout of your own.

CU Cherish Alpha Doodles was one of the alphas featured in the video.

05.07 Video Tutorial: Chopped Up Photos

Running a little behind schedule but here is the next video tutorial to share with you. This video Chelle of Chelle’s Creations shares with you how to make it appear as if you have chopped up a large photo and placed it on your page. Take a peek at her video:

As always Chelle’s amazing team has come up with a few examples to share with you.

Jan (QuiltyMom) took a gorgeous mountain landscape photo and used Chelle’s technique and create this fabulous page. For this page she used the Lay It on There {Doubles} 9 & 10 and bits and pieces from Chelle’s kits: In the Forest, On the Trail, and On the Water.

I really enjoy how Jenn (jennschultz) uses a really large photo to compliment the chopped up photo page. That dinner sure does look delicious, no wonder she cleaned her plate. For this yummy layout Jenn used Lay It on There {Doubles} 17 & 18 and Fabulous 50s (Bundle).

This technique is perfect for those stunning landscape shots that you have as Jenny (Jenn18) demonstrates with her layout. Indian Summer’s colors compliment the spectacular color of nature in the red rocks. She also used the Lay It on There {Doubles} 9 & 10.

Chelle has quite the collection of Lay It On There templates that would work for this type of layout. Head over to her store to check them out. Happy scrapping until we meet again.

04.23 Video Tutorial: Using Layer Masks w/ Big Photos

So sorry this is running a little late today. I have been busy getting outside with my two girls while the weather here in Florida is still a little reasonable. Soon it will be too hot to do much of anything but be in pool. Speaking of a pool watch as Chelle of Chelle’s Creations demonstrates how to get the look of her pool layout in the the video. In this video she is going to share how to use layer mask to use a larger photo in the background of a layout.

Carol (Iowan) shows the same technique on her gorgeous layout using Bluebird on My Shoulder. I really like how Carol positioned her cluster so that is appears as if her daughter is look at it.

If you loved the kit that Chelle used in her video head over to her store to check it out along with the coordinating Little People.


04.09 Video Tutorial: Adding a Pattern to Accordion Flowers

You can never have enough flowers in a kit can you? I’m here today to share a video tutorial by Chelle of Chelle’s Creations showing you how to add a pattern to her CU Accordion Flowers. This way you can create flowers to match whatever kit you choose to scrap with. Enjoy learning something new!

Have you seen Chelle’s newest kit released today, Creme de la Peche? It is gorgeous and these flowers are perfect to add. Kayla (keepscrappin) used them on her beautiful layout along with Chelle’s CU Accordion Flowers and a modified Fiddle-Dee-Dee Designs template.

Head over to Chelle’s store to check out her new kit along with the accordion flowers. While there browse her other kits and pick up a few or create a wish list.

02.26 Video Tutorial: Isolated – Selective Coloring

Have you ever noticed photos where just a certain object in the photo was in color and the rest was black and white? Do you know how to get that same result with the photos you take? Chelle of Chelle’s Creations has created a video tutorial to explain just that. Let’s take a moment to watch and learn.

Helen (winipeg1) has used what she learned from the video to created this simply adorable layout. It almost seems as if Chelle designed the kit around the color of her bow because they go together so well. Helen used the Put a Ring on it kit to create her gorgeous layout.

Unfortunately, the kit used in this video tutorial is retired but take a look around Chelle’s Creations store to see if something else catches your eye. I hope you this video tutorial has given you a new way to showcase some of the photos you have. I hope to see some layouts featuring this technique in the galleries. Happy scrapping until I’m back next month with another fun and exciting tutorial to share with you.

01.29 Video Tutorial: Torn Paper Edge

Are you looking for a way to add a more realistic touch to your layouts? Chelle’s Creations video tutorial is going to share how to give papers in your layouts a torn edge look. Chelle Creations has created a bundle to make it even easier.

Here are a few inspiration pages from Chelle’s creative team.

Krista (kc71595) combined the CU Torn: Whites with Anchors Away and Liberty to create her lovely page. She also chose a template by Scrapping with Liz. I love how the torn paper adds a little texture to the page.

That smile would definitely melt my heart. Helen (winipeg1) used Fleur de Violoette to create this adorable page.

Do you want to easily be able to create the torn paper look on your own pages? Check out Chelle’s Creations CU Torn Bundle featured in the video. While there check out other great products that Chelle has to get your pages going.