


Hello everyone! It’s Jenn here today to show off a new tool, and how you can use it in scrapbooking your layouts.The Background Eraser Tool is a simple way to remove the background of your image. It isn’t perfect, and takes some practice. At the same time, it can give you a little help on extracting items or working with a photo that will be blended. I basically use it as a color eraser, lol! Lets get started.
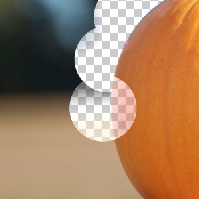
Step 1: Open your image, and re-save it as another name. This tutorial is a [B]destructive[/B] tutorial, and you do not want to ruin your original image. You will be erasing the photo directly on it’s layer. Here is my image, A pumpkin.

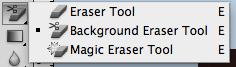
Step 2: Choose the Background Eraser Tool from the Toolbar Menu or press E to get to the Eraser Tool. Press E again to choose the Background Eraser Tool.
Step 3: I’ve made my eraser size about 400, 100 % hardness, and 30% spacing. We will talk about each menu bar option. First, there are three choices (shown as the icons) when erasing for sampling that are on the menu bar – Continuous, Once, and Background Swatch. Most times you will use Continuous or Once.
NOTE: Your “eraser” will look like a circle with a + in the middle. The + is important as that tells PS what color you want deleted, or not deleted. The plus sign is where photoshop take a sample of the color you want to be deleted. When in continuous sampling mode, the pixels inside the circle that are a match to the sampled pixels will be deleted. If you accidentially move the plus sign and click on an area that you don’t want to delete, undo (Command + Z) that step. If you chose once, only the color that you chose with the + sign will be deleted, no matter where you click.
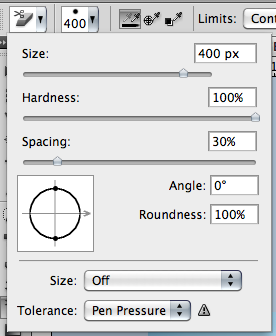
Step 4: Erase. To erase, hover the plus sign on the part of the background that you want to erase. Another important option are the Limits. Limits are Continuous, Discontiguous or Find Edges.
NOTE: Contiguous is the default, and this option will only erase a specific area of pixels – ones that touch. This might be an issue when you have trees, bushes, wires, or other items. Discontiguous means that you have the freedom to erase pixels anywhere if they match the sample color being deleted. If you click on a certain color, it will be deleted throughout your image, and that means in between branches, hair, bushes, etc.

Step 5: As you are deleting pixels that you have sampled, sometimes the colors are very close, and PS doesn’t know what to do. First, you can play with the Tolerance of the color selection, and it’s default is 50%. If you see that the Background Eraser keeps erasing part of the area you’re trying to keep because the color of the background is too similar to your subject, try a lower Tolerance setting.
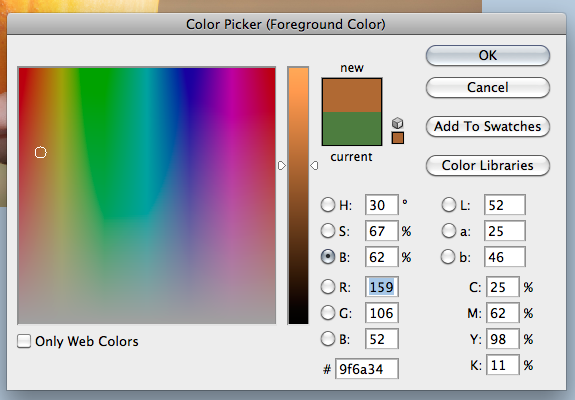
NOTE: Sometimes it seems that the Background Eraser Tool will erase the background in your image as well as erasing part of your subject even after playing with the Tolerance level. This is when we try the Protect Foreground Color. When you click on this option, you can tell PS what color you do not want to delete, even if it is close to the color sample. Just hold down the Option (Alt Key for Windows) and then the Eyedropper Tool will pop up. Choose the color you want to protect, and then you can delete the background without deleting the image you want to keep. You may re-select the Foreground color as needed.
![]()
![]()
Step 6: Keep erasing until you have your object with no background. Here is what I have after erasing the background around the pumpkin edges. I can now make a quick selection and use my image as an extracted item, or blend it into the background.

Here is my layout. I used Chelle’s Creations Carve to scrap our 2012 Perfect Pumpkin. Every year we pick a perfect pumpkin, and this one happened to be it for 2012. 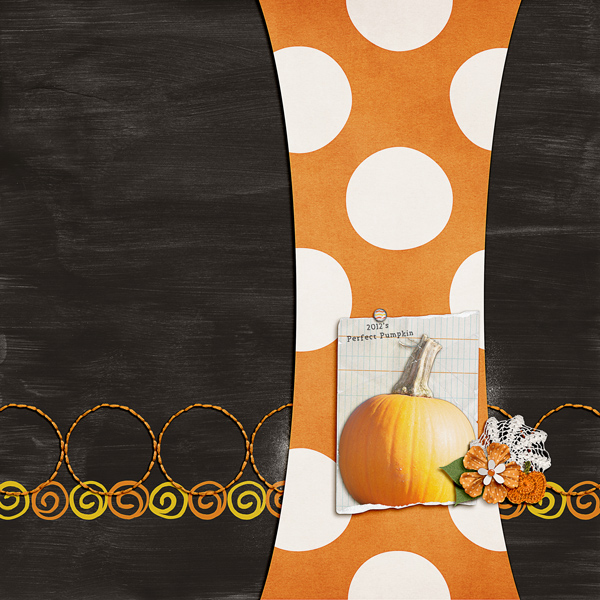
Here is a layout from Carol, aka Iowan. She said “The royal blue background fought with the kit’s blue.” I think it turned out wonderfully! Below her layout, you can see her original photo.

Jennifer, aka jmljensen, created this beautiful layout! Love how it turned out!

Well, there you go! Another tool that is available to you in Photoshop! Have fun playing and erasing!
Thanks for visiting and we’d love to see any layouts you create!


 Hi! I'm Chelle: a 40 something mom of 7. My husband & I live in a rural community in the rocky mountains with our 4 children still at home. In the winters we enjoy sledding & snuggling by the fire. I the cool fall evenings we love relaxing around the campfire & meeting friends at the county fair. Admiring the stars


