


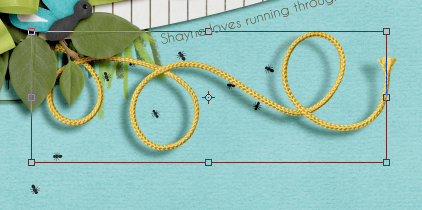
Hi Everyone… It’s Jenn, aka jk703 here to share some tidbits with you in our Tutorial: Bending Shadows. These are what I have learned over the last few years, and I will try to make them as simple as possible. First, you may want to work on a layout that you have already created, and resave to practice on the elements. Here is a page that I’ve created using Chelle’s In The Backyard. See the yellow String – that will be what I use to show how I bend shadows. I don’t know if all of these options are available in PSE or SBC; I am working in PS.

I’ve moved the string to another part of the layout so you can view more of the actual string and shadow.

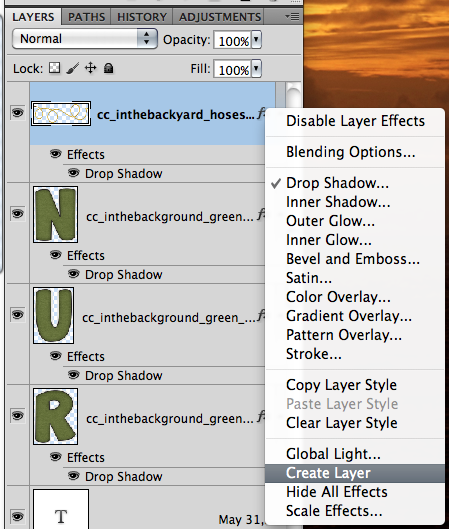
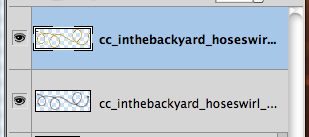
Right click on the string’s layer in the Layers Palette, and choose to Create Layer. This will put the strings shadow on it’s own layer separated from the actual string. This really helps in being able to bend the shadow.
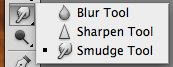
Next, choose the Smudge Tool from the Tools Menu. Here are the settings I have for the Smudge Tool – Size 160, Normal, and 25% strength.
![]()
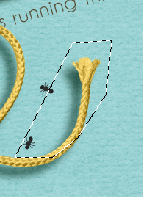
Once you have the smudge tool selected, and all the setting as you like, make sure you have the shadow (of the string) selected in the Layers Palette. Start to “smudge” or move the SHADOW of the string away from the end of the string. It will appear as if it is lifting off the page some. Try to take the lighting into account.
After you have smudged enough and like your look, we have one more step. Choose the Eraser Tool from the Tools Menu. Here is the settings that I will use for the Eraser Tool. For the area that is lifted, I’ve erased some of the shadow – to make it lighter and less defined. As some shadows get further from the paper, they usually become less defined and not as dark as the others that are closer to the paper.
![]()

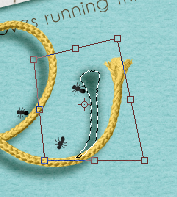
Another way to bend shadows is to use the Polygonal Lasso Tool. With your shadow on a different layer (as done above), create a shape by clicking and leaving anchor points. Click them around the “end” of the string. You will want to make sure be careful and choose your spacing wisely. Here is where I chose to move my string shadow.
As you look at my image above, you can see that there is an edge where it doesn’t appear to be a shadow and then I surround all of the other shadow and give some space. Once you have connected the shape, you should see the marching ants. Now, you will choose the Move Tool. You will see 8 points around your shape. If you press on the Command (Control on Windows), you get a triangle cursor when hovering over one of the four cursor points. Click on a corner and move the shadow as you like. Continue to do this until you have your string shadow as you want it to look.
Next, same as above, use the Eraser Tool to make your shadow layer appear less detailed and lighter.
One last way to bend your shadows (that I know) is to Warp them. Here’s a basic how to:
From the Top Menu Bar, choose Edit > Transform > Warp. You will see a square with 9 parts appear.
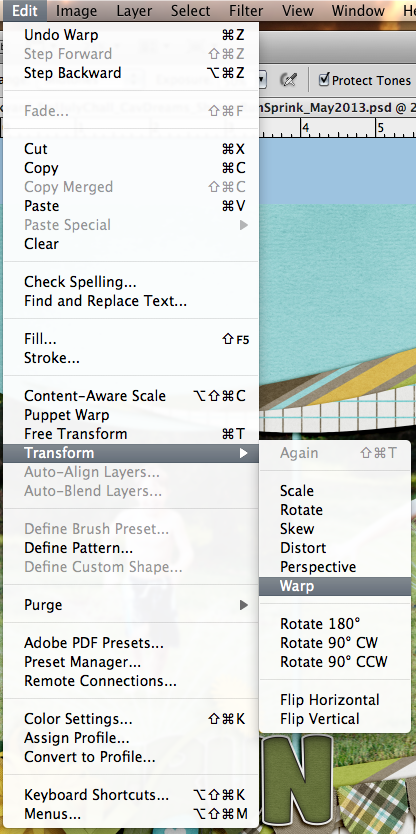
Click anywhere in the box, and slightly move the shadow. Be careful – the whole layer will move. Remember, there is an Undo Button! This takes some practice and getting used to. This is useful when you want to move more than just an end, plus you can move different parts together.
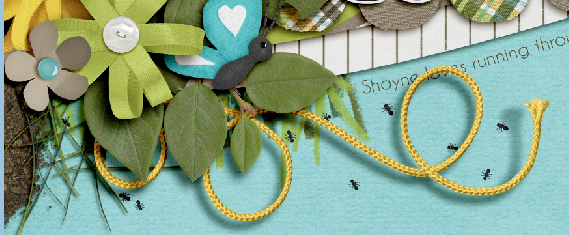
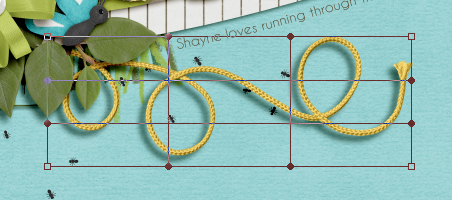
Here it is in action. My layout using At The Park by Chelle, and a freebie template that I got today (7/17) on the scrap Orchard blog from Scrapping with Liz. I used the Polygonal Lasso Tool for my page. I actually lifted both ends of the string.

Here is another layout from Leslie (lab130) that she created using On The Water by Chelle. She smudged the banner and word bits.

Those are the three ways that I’ve come to rely on – there are so many ways to do things in Photoshop, so play with these, and give it a try! Have a great day!
Jenn (jk703)


 Hi! I'm Chelle: a 40 something mom of 7. My husband & I live in a rural community in the rocky mountains with our 4 children still at home. In the winters we enjoy sledding & snuggling by the fire. I the cool fall evenings we love relaxing around the campfire & meeting friends at the county fair. Admiring the stars


I ‘ve been Warping and Free Transforming my shadows quite long (not being satisfied with the Drop Shadow Style), but I usually create a separate layer for each shadow (setting the Blending Mode to Multiply) and then play with it. I’ve never heard that Shadows can be separated from the layer. I wonder – what is faster: Drop Shadow – Create Layer – and modify it, or my old way… I must try the new technique as soon as possible! Thanks for he useful tip!
Not about shadows, but omigosh those ants are sooo cute! And the grass and dirt–awesome…I’d better give this kit a closer look.