Modifying Templates

It’s time to stretch ourselves and maybe think outside of the box for a bit. There are lots of great templates in the digital scrapbooking world including ones Chelle has in her store. But, maybe you’d like to use something you have already and make it all new, stretch your stash a little. Chelle’s very talented CT members have been playing with templates and their favorite Chelle’s Creations kits to show you how they like to modify templates.

Changing it up can be as easy as making just a few simple moves. Take Roxana’s page, for example. She used Lay It On There {Singles} 5&6 and One Year Older. Then, she modified the background papers and added a photo spot. Now, the template looks totally different, and the page is perfect for capturing her celebration memories.ccjuly10

Kayla got really creative and resized a double page template to fit on one 12×12 page. She began with the Lay It On There {Doubles} 20 freebie. (Hurry: it’s still available for a few more days as the July Template Challenge at Scrap Orchard). She says this about her process: “I simply opened the double file selected all layers except the background layer and copied them to a 12×12 layout. Then shrunk it all down to fit on the page to my liking. I love that I still have a multi-photo layout with plenty of white space to give it a more roomy feel.” She used the Lemonade Stand kit and alpha. DollShop_Feb12_web

Jenn took inspiration from Kayla and did something similar. She began with the Lay It On There {Doubles} 3&4 and the Big City kit. I love the way it looks as the center of her single page. city streets

I hope you’re inspired to use those templates in new ways. If you have a creative way to re-cycle a template, leave us a comment below.

by_Cheryl

Adding Lyrics to your Layout | Digital Scrapbook Inspiration

Hey Scrappers!

One fun thing you can do on a layout is add the lyrics to your favorite song…or a song relevant to the memory you are scrapping.  Lyrics to a song are typically copyrighted (there are very few exceptions) so you won’t find a paper with the lyrics to Spoonful of Sugar in a Mary Poppins kit, but that doesn’t mean you can’t make your own.

Create a text box the size of your paper.  Then either type the lyrics or copy and paste them from a lyrics site on the internet.  Paste them over and over until it fills the space.  Tweak your font, alignment, & leading until everything looks right.  You can also play with the blending modes & opacity.  Ta Da!  Now you have a new paper perfect for your memory.

Check out these layouts from Jen & Jan:

web_yellowsubmarine_withlyrics_zpsfs4fjh1d

47bd

Flower Layering and Tips

Flower Layering and Tips

Hi everyone! Happy New Year! I’m excited to show you my post today. This is Jenn, jk703, here today to share some fun ideas and some awesome pages using Chelle’s Creations supplies. This is so easy, and I had so much fun. And I’m sure you can relate – I made my layout for the post, and it became my newest most favorite layout. Actually, many of my favorite layouts are using Chelle’s supplies. They make me and my pages happy!

Today, we are going to play with flowers – specifically Flower Layering and Tips. For my example images, I’ve used Chelle’s At the Beach kit, and the At the Park Kit. So versatile, and they work well together!

Let’s get to it! Flowers are *usually* included in kits, and there are always so many and in so many colors. I want to use them all sometimes, but that doesn’t always look right for me or my style. So, this is an alternative. Layer them up, change, twist and flip them to make them work for you.

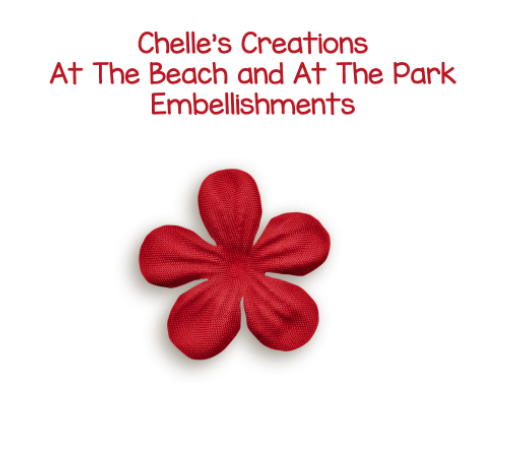
Here is the start of my flower. A pretty bright red, with a shadow style and it looks nice!

Flowers1


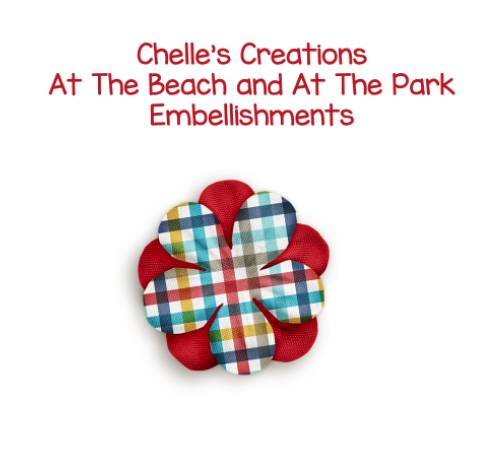
Next, I’ve added the same flower but one that has a pattern on it, right on top. Then I used my Move Tool and twisted it a little bit. Still looks a bit unfinished, right?

Flowers2


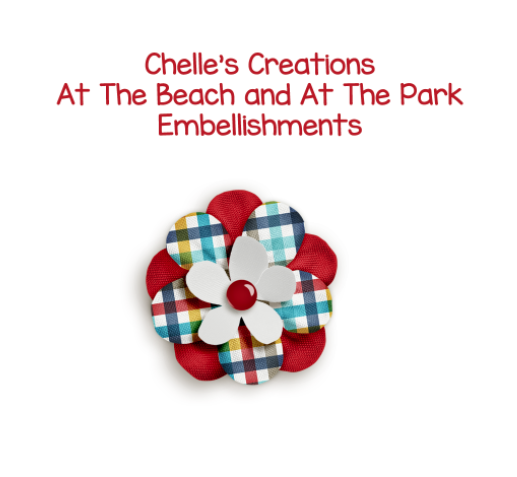
Next, I added one of Chelle’s super awesome little paper flowers to the middle, and your shadow styles – and you get this little gem. Viola! A perfectly pretty layered flower. Isn’t it pretty? I just love it! (Yes, I’m a bit dorky, lol – sorry!).


Flowers3


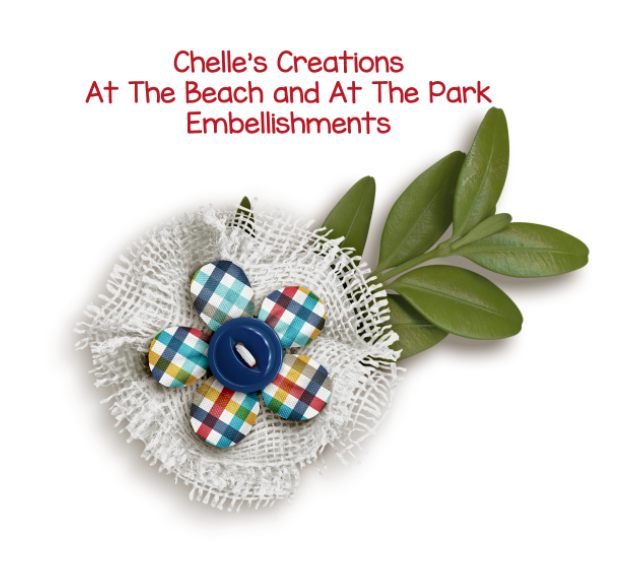
What about other kinds of flowers that you see in her kits? They all work with this method. Here is a burlap flower with a buttoning the center. It looks nice, and that blue looks great on the white. How can we add to it? We layer it up!


Flowers4


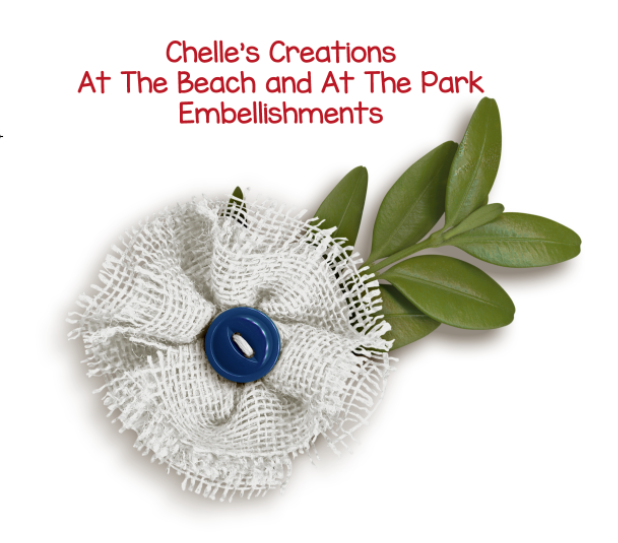
Adding that same plaid flower layer from above, just squeeze it in between the white burlap and the button. Just give it a little oomph, more than just a button.

Flowers5


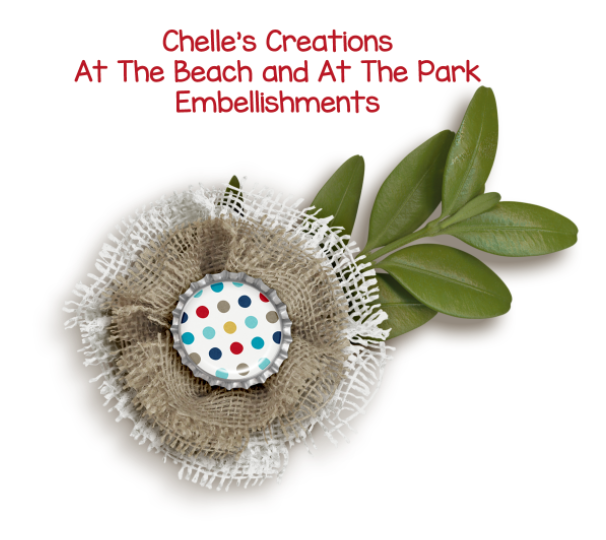
You could even layer up burlap flowers of different colors, and change out the button to a decorated bottle cap. Just remember to make the 2nd flower a bit smaller than the one in back, and add a shadow style.


Flowers6


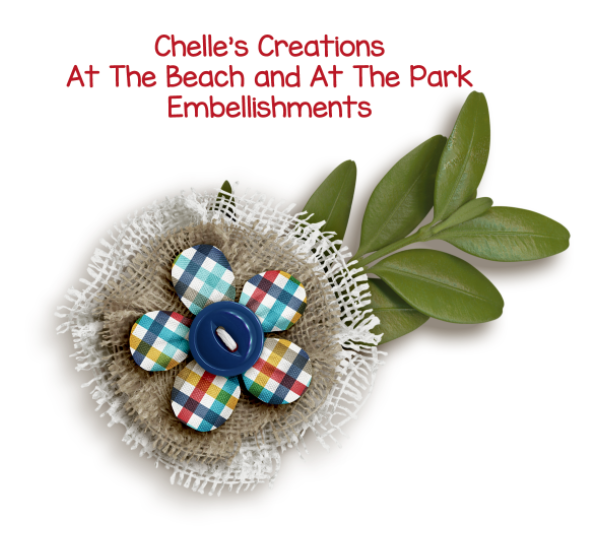
Or, mix it up by adding the 2 burlap flower layers, the fabric flower layer and the button. Making layered flowers like this has infinite possibilities. You can stretch your stash another 100 flowers.

Flowers7


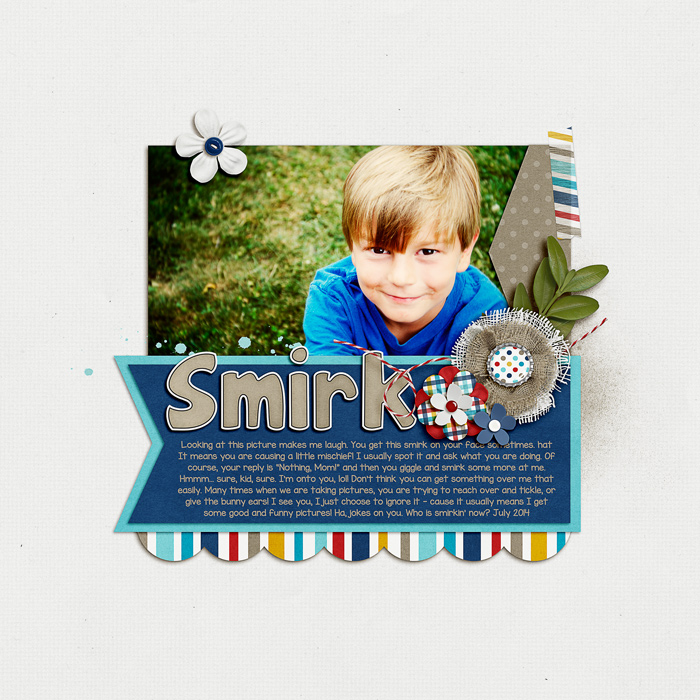
After I was done layering up and trying out all kinds of flowers, the ones above were my favorite mix. I made a layout and I LOVE it! For this layout, I also used one of Scrapping with Liz’s templates – New Year’s Templates. – which I modified a lot. Here’s my page:

SO_CC_AtBeachPark_SwlNewYrsTemps_MissKinder_SmirkJul2014_WEB


Flower Layering and Tips: 

Play and try out flowers you don’t think will work together. It might surprise you. I didn’t think the two burlap flowers above would look good, but with a little shrinkage and a twist, it came out pretty sharp looking.

Try bold patterns or shapes with classic colors. You might like the combination.

Give each layer a shadow style so that each layer of flower has some depth and definition. Shadow Styles make it look a bit more realistic. If you had flowers on your table and put them on top of one another, you would not have flat flowers. Neither should your layouts. :)

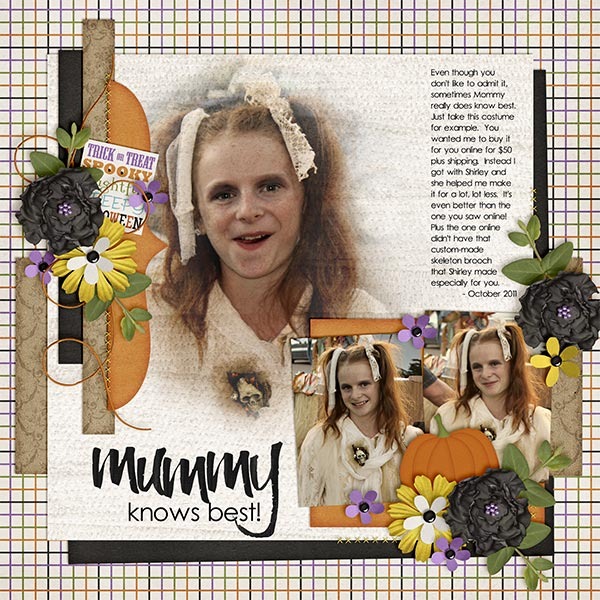
Try clustering your layered flowers. My layout above combines the flowers I made and then adds another little paper flower. It’s a boy page, but the colors and types of flowers means that it doesn’t come off as a girly page. The burlap flowers give a sturdy solid feeling.

For flowers, I work in groups of odd numbers – 1, 3, 5. Above, my layout uses 3 in a cluster, and then 1 above the photo. With you eye, you may go from the white top flower, down over the photo to the flower cluster, and then over to read the title. (At least, that is how my “eye” flows over the page, lol!)

The layered flowers adds visual interest to the layout, as well as depth and different texture. You that toward your advantage and allow those flowers to convey feelings. My page above is bright, fun, on the boyish side, and solid. I think my flowers convey that – they aren’t soft, dainty or pastel.

Try different centers for your flowers – Brads, Buttons, Beads, Coins, or any other embellishments that might fit. Even a metal asterisk from an alpha might work.


I had some lovely layouts submitted for Flower Layering and Tips post from my co-CT members. Here are their pages. What is funny is that they both picked Cozy Christmas for their pages! It must be because it’s so cold out, and everyone would love to be cozy and warm.

Jenn (jennshultz) created this  layout. She mixes up her flower layers with different types of flowers and lots of great colors – as well as adding shadow styles to give each flower it’s own depth. She also used the Cozy Christmas alpha that matches the kit. brrr-1


Jan (QuiltyMom) made the next chilly layouts with lots of snowflakes and flowers. Jan worked with the template by Down This Road Designs and worked the ideas into her flowers. She layered some flowers on snowflakes, and then layered more flowers on top – very clever. She alternated colors and added shadow styles. She also used CU Snowflakes for her layout. noel

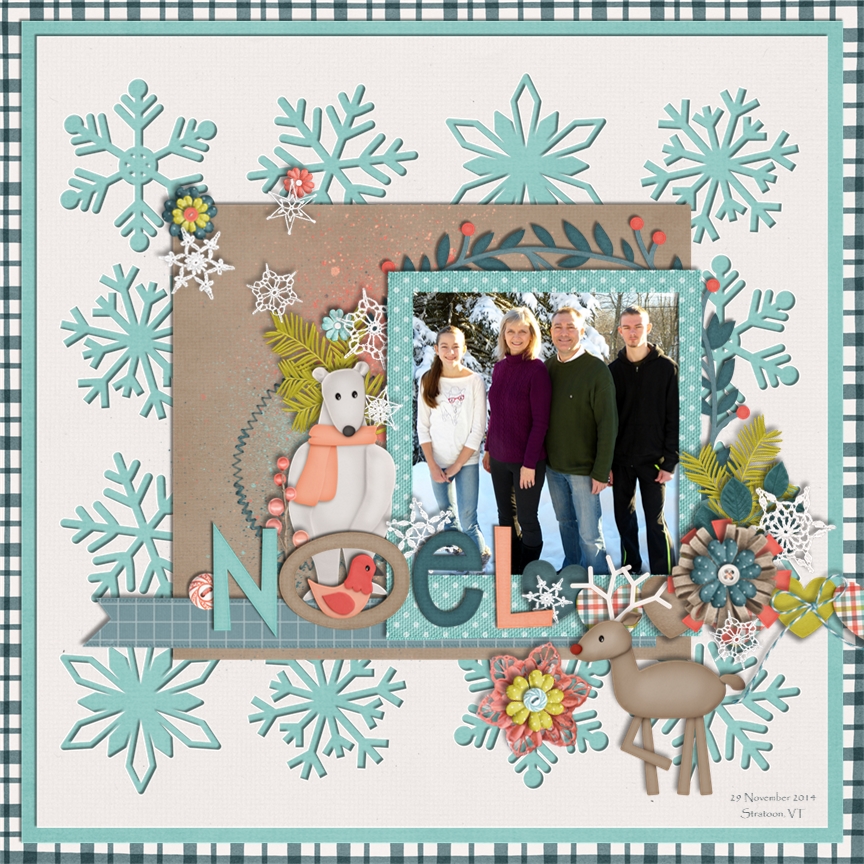
There you go. Flower Layering and Tips to start off your layouts. Give it a try and I’d totally love to see what you create! Thanks for stopping by today and have fun scrapping!

by_Jenn


Tweaking Templates

I don’t know about you, but I almost NEVER start a digital scrapbooking page without a template. Even if I make significant changes to it, I still prefer starting with a template, and tweaking templates is a great way to stretch your stash. That’s what we’re looking at today: tweaking templates. A few of Chelle’s CTMs have made layouts with templates and purposely modified them.

Christine started with one of the Scrapping with Liz Long Blocks Templates. She flipped it and removed a lot of the elements. She also moved the title from the top to the bottom of the page and used Chelle’s Home for the Holidays kit. I love how she chose to put one photo across the series of long block photo spots in the template. Christine

Next, Krista combined two kits of Chelle’s, At the Park and At the Beach, for a perfect page about their visit to Devil’s Punchbowl on their first day of Spring Break. She started with a template from Fuss Free: Stitched Together by Fiddle Dee Dee Designs  and changed it up quite a bit. I really love how she has placed the sun peeking from behind the strip of plaid paper.DevilsPunchbowl_Krista

Finally, Karen made a birthday page using One Year Older, the perfect kit choice. She started with a template from Scrapping with Liz Inspired by Jenn Templates, rotated it, and then switched out a journal spot for a third photo on her page. I love her clusters of presents and tissue paper. oneyearolder600x600Karen

I hope you’re inspired to tweak those templates and stretch your stash! Here’s a closer look at the kits the ladies have used.

cc_atthebeachcc_attheparkcc_home4holidays_kit_previewcc_oneyearolder

by_Cheryl

Ideas & Resources: Printed Guest Book

Ideas & Resources: Printed Guest Book

Hi Everyone! I’m here on one of my off weeks – this is Jenn, jk703! I used to be super duper crafty, but after kids, I lost interest in the glue and all the clean up! That’s when I became obsessed with digital scrapbooking! Recently, I did something that I’ve never done before! So, today, I’m going to share my story – Ideas & Resources: Printed Guest Book!

I’ve been scrapping for a few years now, and have printed my digital pages.  I was thrown for a loop when I was asked IF I could create a special gift for my husband’s cousin. A Guest Book for her wedding. Hmmm….I needed to create a masterpiece! Well, I took on that challenge and it was a bit of a stumble for me to start.  I scrap 12×12, but the book was going to be 8.5 x 11. I was limited on the pages, and what pictures would be included. What really through me for a loop was that I was scrapping for someone else, and I was completely worried she wouldn’t like our gift! But, after working hard, getting feedback, I loved the book! I’ve only included a few of the pages here, but I wasn’t disappointed in the least! I even mentioned and shared my Album with Liz of Scrapping with Liz, so maybe in the future there might be templates available. Check this out!

I’ve tried to share the photos with allowing for some privacy, so I added the information to the pages. Hope you understand. This was a Lay Flat printed book from My Publisher. First page uses Love Grows.

GuestBook1


I lightened this picture up a little, just to show the detail. I added initials inside the little heart stamp. Just to add a little personal touch. Kit: Love Grows.

GuestBook2

This page was a bit tough for me to create, only since I wanted to have the writing lines on each side, as well as keeping the couple intact. I was trying to mix up the formats of the pages, and it worked perfectly in the end. Kit for this page is Traveler.

GuestBook3

This next page uses In The Backyard. Working with the photos and colors, this one really was a fun page.


GuestBook4

Here is a detail shot of the dandelion seeds that are on the lined side of the page. Faint, but I didn’t want to distract form the message being left.

GuestBook5


Trying to make the book continuous, yet different for every page depended on the coloring of the photos and what layout I finally settled on. I did’t want every page to be creme or pale colors, so I tried to mix up the colors. Kit Used: Toil and Trouble.

GuestBook6

Close up of how the printing for the lay Flat book worked. I was worried, but they turned out awesome!

GuestBook7

Another page with some details, but mainly the photos take center stage. Kit Used: Apple Of My Eye.

GuestBook8

Close Up of the flower and burlap.

GuestBook9


There you have it… Ideas & Resources: Printed Guest Book. I loved the book so much, that I wanted to keep a copy for myself! I was so excited when they were delivered!

Oh… She LOVED the book, and so many people commented on it at her wedding. To me, and to her family! It was a special, one of a kind item that she can treasure.

by_Jenn


Basic Black Stitched Alpha & BUGTOWN – $5 only | Digital Scrapbook Inspiration

Hey Scrappers,

How is your scrapping going this year.  I was doing GREAT until we all got sick a week or so ago.  But that’s ok.  This isn’t about keeping score.  It isn’t about getting behind or catching up.  It’s about scrapping and having fun.  AND then I fell of the wagon COMPLETELY last week.  My computer died.  Like white-screen-of-death-won’t-turn-on dead.  But I was out of town with family so I couldn’t take it in to be fixed.  Got home and it turned on and worked like a charm!  (and I scrapped 2 double page spreads) until today when it went all wonky again.  :(  So it’s in the shop.  If I can get PS to run on my OLD laptop, I’ll keep going.  If not, I’ll sort photos & find templates and do other ‘scrappy’ things ’til my baby is back again.  (You call your computer your baby too, right?  it’s not just me?)

In the meantime, the alpha this week is AMAZING!!!!  My favorite way to use it is to add color.  And that’s SO easy.  Just check out the tip below.

NEW!!

Hey, remember how I do a LIVE event in Salt Lake City every spring?  Well, each year we put together a FABULOUS bundle to celebrate that event.  This year we’ve created BUGTOWN!  It is AMAZING!  Want to see it up close?

Can you see those clay butterflies in the preview?  And the little green caterpillar?  Yup, those are some of my parts.

There is even a little ant in there too!

TWO things you need to know.

#1.  It’s ONLY $5!!!!

#2.  It’s only available for a limited time…like short limited time.  So hurry and snag it now.  It’ll be adorable for memories with your snuggle bug…or your cute as a bug…anything nature…spring…It’s fabulous!


I LOVE stretching my digi stash.  It’s one of the best things about digi.  You can re-use stuff…and you can change it up and re-use it again and again!  The Basic Black Stitched Alpha is perfect for this.  Just use the technique in this you-tube tutorial.  You can create alphas like these:

See you next week!  I hope my computer gets fixed super-fast so I can get back to creating.  Two weeks of no computer is SUCH A long time for a creative nut like me.

Classics: Kraftabulous

Are you a fan of Kraft papers? I am! Chelle’s Creations Creative Team Members have some beautiful digital scrapbooking pages they’ve made combining Kraftabulous with some of their favorite Chelle’s Creations kits. I can’t wait to show you!

First, Jen made a page about her struggle with vision problems, and she has used one of the Kraftabulous papers as a background for her page. This is exactly why they were made! I love the look of the white journaling on top, and Chelle’s See Clearly Now kit is the perfect choice for her page.   29964Jen

Next, Roxana used a star-patterned Kraftabulous paper for her background. It’s a perfect choice to highlight the Bronze Award her son won at school. Congratulations! Look how well the blue and yellow colors pop off the background bringing a very happy feel to the page. 26-bronzaward-webRoxana

Next, Brenda, one of the guests on Chelle’s team this month, has made an adorable page about her sleepy little girl after a fun day at the park. She has used the Kraftabulous papers for the background and the photo mats, and she even filled the title with the kraft paper. She has added the perfect little pop of color to match her little one’s dress using Chelle’s newest CU item, CU Felt Flowers 2. Kraftabulous---Sleepy-Girl_zps6975dd4dBrenda

Finally, Mel has used the papers in a bit different way  to show you how versatile they are. She has a stacked paper background with a kraft paper in the middle, and she has added a bit of the same paper in the matting of her photo. The kraft colors are perfect with Chelle’s Indian Summer kit, and the heart pattern in the paper is a perfect complement to the felt heart in the kit.Teanna-amp-JaymeMel

Did you notice how well the papers coordinate with all different colors of kits? Being neutral colors means they will truly complement any kit. Here’s a closer look at the Kraftabulous papers in the market. They’re a great price for such a versatile way to stretch your stash. cc_kraftabulous

by_Cheryl

Tweaking Templates | Digital Scrapbooking Skills

Hi Chelle’s fans! Do you use templates for making digital scrapbooking pages? I don’t think I can scrap without them. I have become quite accustomed to the time saving of using templates, but sometimes I can’t find the perfect template, and I need to tweak a template to make it perfect for a particular layout. Some of Chelle’s team members have done that and have some example layouts to show you what they do when they want to make a template “new.”

Roxana chose to use one of Chelle’s Archery templates given as a prize for a challenge during the NSD events in May, shown in this image here.cc_archery_doubletemps She took the double template and cut it down to a single 12×12 template and did a bit of arranging of the photos and flipped a layer or two. It made a terrific single page with her adorable large photo taking center stage. I love how she added her journal notes on top of the photo. Here’s her page: 23-draculaagain-web_roxana Kayla has an example to show how you can combine 2 templates to make a brand new one. She used templates from Bracket Love and Boo-tiful Blends, which are her own creations, by the way.  She combined the two templates by moving 2 of the photo spots in Bracket Love down and to the corner and replaced the 3rd photo spot with the photo blending mask from the Boo-tiful Blends template. MummyKnowsBest_Oct11_webKayla I love that large photo in a blended photo spot, and her perfect clusters are made from the Eeeeek Bundle and Kraftabulous. Her title is very fitting for her story, and it’s made from Chelle’s Wet Paint Alpha.

Tweaking templates is a great way to stretch your stash. Try experimenting with a template or two and see what gorgeousness you can make. If you use any of her products, post your layouts to Chelle’s Gallery at Scrap Orchard. I would love to see them!

Using Tags

Tags come in many digital scrapbooking kits, in various shapes and sizes, but do you always use them the same way? Do you struggle with creative ways to use the tags you have? Take a look at what Chelle’s Creations CT members have done to inspire you to use your tags:

First, Roxana has created a refreshing page with pool pictures and used the tags as photo mats and journal spots. I love the stitching on the tags!  50-cieneguilla-left-webRoxana Next, Lynett used a tag for part of her title and a smaller tag tucked away under the pictures for the date. She must be more limber than me, but that Twister game sure looks like fun! twistedLynette

I have to admit, I’ve never thought about doing this, but Kayla used a grouping of tags on her layout to make a striking border that is a perfect fit for her page about her priceless children. Priceless_Jan11_webKayla I think I’ll have to scraplift her idea; it’s so appropriate for her page.

Finally, Neenee is a girl after my own heart. I struggle with grabbing all the wrong kids of foods for snacks, and her page tells my story as well as her own. She has made a title like a border with each letter of the title on a different tag, and it makes a stunning impact. I may have to copy this and put it on my office bulletin board to remind me to control the munchies. chelle_snacks_webNeenee If your stash is low on tags, you can find some great choices in Chelle’s store here and here.

Getting Creative with Buttons and Brads 2.22.12

Hello digital scrapbooking friends. Today I would like to share with you a few ideas about how to use the buttons and brads found in so many of Chelle’s Creations kits. Chelle’s creative team has come up with some fun ways to use these items.
Karen combined buttons from different Chelle’s Creations kits to create this colorful frame around her photo. It may have been a little time consuming but I think it definately makes one amazing page.

Monica used the buttons to represent bubbles on her adorable page.

Jenn used buttons to create a decortive layer on her page.

Ophelia added four basketball brads to her page. The first three are them semi-transparent with a dotted line added to show the movement of the ball. The fourth brad is in the basket.

I hope these pages inspired you to use either brads or buttons in a different way.